Desktop Administrators' Guide to GNOME Lockdown and Preconfiguration
Sayamindu Dasgupta
Copyright © 2007 Sayamindu Dasgupta
| Revision History | ||
|---|---|---|
| Revision 0.2 | 20th August, 2007 | |
| Revision 0.1 | 15th June, 2007 | |
Lockdown is the mechanism which is used to bar users using a computing environnment from performing certain actions (like, for instance, printing files, or saving files to disk). The GNOME Desktop already has lockdown support in a few areas (especially the panel and the epiphany web browser). This document aims to cover all the lockdown features found in GNOME, as well as act as a guide on how to preconfigure the desktop settings.
The existing GNOME System Administration Guide provides an excellent overview of the GNOME Desktop from an administrator's perspective. However, it does not, in its current form, delve deep into the tools and methods for performing lockdown and preconfiguration. This document aims to cover that gap and act as a complementary document to the System Administration Guide. It is assumed throughout that the reader of this document has already gone through the GNOME System Administration Guide.
Introduction
This document aims to serve as a guide for setting up the GNOME Desktop (or multiple instances of it) for mass scale deployment. It also explains on how to tweak GNOME for special kind of deployments (unmanned kiosks, public internet access terminals, etc).
An administrator in virtual any kind of deployment (other than the one in a normal home desktop system) usually has to perform two categories of actions before the deployment can be rolled out. They are described in brief below.
Lockdown
Lockdown is the process of disallowing the users from performing certain actions. "Certain actions" can range from changing the desktop wallpaper to saving any kind of to the hard disk. At present, GNOME lets the administrator define any setting in the Desktop as mandatory, meaning that it will not be changeable by the user. Also, quite a few components of the GNOME Desktop define lockdown settings of their own. For example, the GNOME panel can be setup to allow a specific set of applets and action buttons.
Pre-configuration
Apart from lockdown, the desktop administrator will almost certainly need to preconfigure certain aspects of the Desktop. In a typical deployment this may include changing the look and feel of the desktop and/or the proxy servers. However some of these settings may need to be locked down or made mandatory depending on the type of deployment being made. For example in many scenarios, the wallpaper may need to be made unchangeable. This kind of requirements need to combine pre-configuration with lockdown, and this document will explain how to handle such situations as well.
The internals of GNOME configuration - GConf
The system to store configuration settings for the GNOME applications is known as Gconf. By default, Gconf uses an XML based back-end to store all the data it has to manage, though in theory, other back-ends (such as a LDAP based one) are also possible. The settings are stored in a tree like hierarchy stronly resembling the Unix filesystem, with dedicated directories for each application (eg: /apps/epiphany) and subdirectories specifying the preference category (eg: /apps/epiphany/general/homepage). All the settings related data are stored in in "key-value" pairs. For example, the home-page of the Epiphany web browser is stored as "http://www.google.com" under the GConf Preference Key "/apps/epiphany/general/homepage". Values associated with preference keys can be boolean (True/False), strings, integers or lists of strings/integers.
Preferences in GConf can be:
Mandatory (ie, unchangeable by users)
Default
Apart from the settings data repository, GConf also includes a daemon which listens for changes in the repository and notifies applications about the change if and when required. Also, a command line tool gconftool-2 is also included with the GConf package. gconftool-2 lets you view and modify the GConf repository from the command line. For example, to change the value of the homepage of the Epiphany web browser to http://www.gnome.org, you simply need to execute the command:
gconftool-2 --set "/apps/epiphany/general/homepage" --type string "http://www.gnome.org"
For a detailed idea of GConf, you can look at the latest GNOME Desktop System Administration Guide for more in depth information.
Lockdown and GNOME
Lockdown options
The options that can be used to perform lockdown in GNOME can be divided into a few categories. Each lockdown option comes with an associated Gconf key which controls whether the lockdown feature is enabled or not. The relevant Gconf keys are described in the tables below.
General Options
These options apply to the desktop as a whole, and all GNOME applications can be affected by enabling/disabling these options.
| Caution |
Note that applications that are not a part of the core GNOME Desktop and Developer Platform may not be affected by the global lockdown settings. Setting lockdown options does not guarantee that an application would be locked down as intended. The administrator is encouraged to verify that all the lockdown options work for each individual application in the system. The recommended way of implementing lockdown is to enable all the lockdown options and then then disable them one by one, depending on the functionality required. |
Table 1. Lockdown options: General
| Gconf Key | Type | Description | ||
|---|---|---|---|---|
| /desktop/gnome/lockdown/disable_command_line | Boolean |
This key, if enabled, prevents the user from accessing
the "Run Command" dialog.
| ||
| /desktop/gnome/lockdown/disable_lock_screen | Boolean | This key, if enabled, disallows the user to lock the screen. | ||
| /desktop/gnome/lockdown/disable_printing | Boolean | This key, if enabled, prevents the user from printing (it disables the print option). | ||
| /desktop/gnome/lockdown/disable_print_setup | Boolean | This key, if enabled, prevents the user from modifying print settings by disallowing access to the "Print Setup" dialog box. | ||
| /desktop/gnome/lockdown/disable_save_to_disk | Boolean | This key, if enabled, prevents the user from saving any files via GNOME applications. All "Save" and "Save As" options are disabled if this key is set to True. | ||
| /desktop/gnome/lockdown/disable_user_switching | Boolean | This key, if set, disallows the user to switch to another user account if her session is already running. |
GNOME Panel
These options apply to the GNOME Panel.
Table 2. Lockdown options: GNOME Panel
| Gconf Key | Type | Description |
|---|---|---|
| /apps/panel/global/locked_down | Boolean |
This key, if enabled, prevents the users from modifying the
panel altogether (though this may not apply to the individual
applets in the panel).
|
| /apps/panel/global/disable_force_quit | Boolean | This key, if enabled, disallows the user from forcing an application to quit uncleanly (killing the application) by remving access to the force quit button. |
| /apps/panel/global/disable_lock_screen | Boolean | This key, if enabled, prevents the user from accessing the "Lock Screen" panel button and menu entries. |
| /apps/panel/global/disable_log_out | Boolean | This key, if enabled, prevents the user from logging out by disabling access to the "Log Out" button and menu entries. |
| /apps/panel/global/disabled_applets | List of Strings |
This is a list of disabled applets (identified by IIDs). As an example, if you wish
to disable the Clock applet, add "OAFIID:GNOME_ClockApplet" to the list.
|
Epiphany Web Browser
These options apply to the Epiphany Web Browser.
Table 3. Lockdown options: Epiphany Web Browser
| Gconf Key | Type | Description |
|---|---|---|
| /apps/epiphany/lockdown/disable_arbitrary_url | Boolean | This key, if enabled, prevents the user from entering anything in the address bar of Epiphany. They may only follow links from the home page. |
| /apps/epiphany/lockdown/disable_bookmark_editing | Boolean | This key, if enabled, disallows the user from editing the bookmark list. |
| /apps/epiphany/lockdown/disable_history | Boolean | This key, if enabled, disables all historical information by disabling back and forward navigation, not allowing the history dialog and hiding the most used bookmarks list. |
| /apps/epiphany/lockdown/disable_javascript_chrome | Boolean | This key, if enabled, disables JavaScript's control over window chrome. |
| /apps/epiphany/lockdown/disable_quit | Boolean | This key, if enabled, prevents the user from quiting the browser. |
| /apps/epiphany/lockdown/disable_toolbar_editing | Boolean | This key, if enabled, prevents the user from editing the browser toolbar. |
| /apps/epiphany/lockdown/hide_menubar | Boolean |
This key, if enabled, will hide the menubar.
|
| /apps/epiphany/lockdown/disable_unsafe_protocols | Boolean | This key, if enabled, prevents the user from loading content via protocols other than http and https. However, additional protocols maybe added to this list by modifying the Gconf key /apps/epiphany/lockdown/additional_safe_protocols (described below). |
| /apps/epiphany/lockdown/additional_safe_protocols | List of Strings | This is a list of additional protocols (other than http and https) which may be used by the users to load content using Epiphany when the key /apps/epiphany/lockdown/disable_unsafe_protocols is set. |
Enabling Lockdown
Lockdown can be done directly using the command line tool gconftool-2. One can also use the graphical application Pessulus to do the lockdown (one of the advantages of Pessulus is that it allows you to lockdown OpenOffice.org as well, apart from the usual GNOME applications.)
Locking down with gconftool-2
You will almost certainly want your lockdown setting to be mandatory, ie unchangeable by
the user. To do, so you will need to bypass the GConf daemon and write to the mandatory
GConf sources (using the --direct option). For example, to disable "quit" in
the Epiphany web browser, you may issue the command (as the administrator of the system):
gconftool-2 --direct --config-source xml:readwrite:/etc/gconf/gconf.xml.mandatory --type boolean --set /apps/epiphany/lockdown/disable_quit true
| Caution |
Note that you must ensure that the GConf daemon is not running when you use the
|
Locking down with Pessulus
The other alternative is to use Pessulus, which offers a graphical interface to manage all the lockdown settings from a single application.
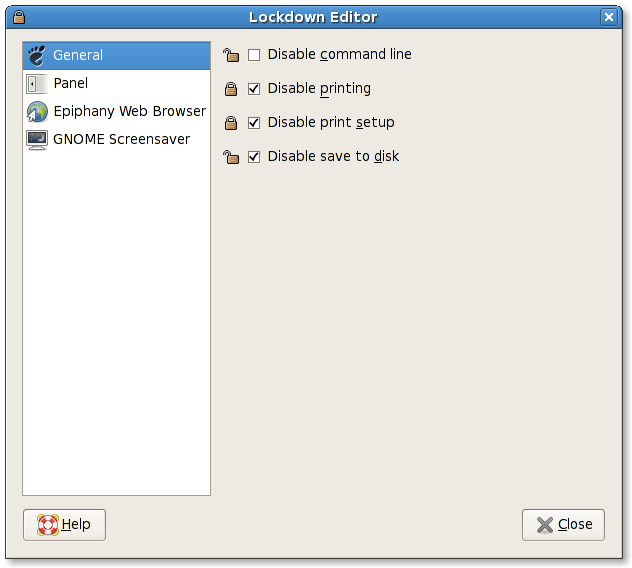
As evident from the screenshot, the lockdown options are organised by category (as in the previous section), and if Pessulus is run as root (or via sudo in Ubuntu like distributions), to the left of each option (checkbox), a lock icon appears. Clicking on the icon closes the lock, indicating that the option has been made mandatory. To make it the default option instead of making it mandatory, just make sure that the icon is showing an open lock (if it is closed, click on it, and it will immediately become open).
Predefining user profiles for deployment with Sabayon
Sabayon is a tool to (pre)configure and lockdown user desktops for large scale deployments. Sabayon presents the desktop as it would appear to the end user to the administrator, who further customises it and locks it down if required. All the customisations and modifications are stored in a zip file which is applied over a user's settings when the user logs in.
Sabayon profiles
In any deployment, there are bound to be different categories of users, each with different requirements. For example, in a school, the people in the finance department may only require to run a specific accounting package, while students would need access to almost all the applications installed in their computers. The desktop settings for each such category would obviously be different. Sabayon handles this by having multiple users belonging to the same category (students, for instance) associated with a single profile.
Creating a profile
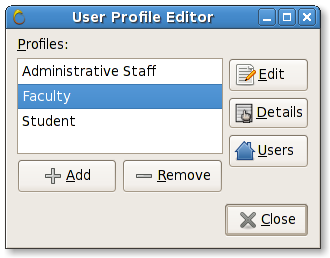
The Sabayon main window (Figure 2) shows the list of profiles that have been created by the user. The administrator may choose to add a new profile, to edit an existing profile, to delete an exisiting profile or associate users with an existing profile. There is also a button which shows the settings associated with a particular profile.
Editing a profile
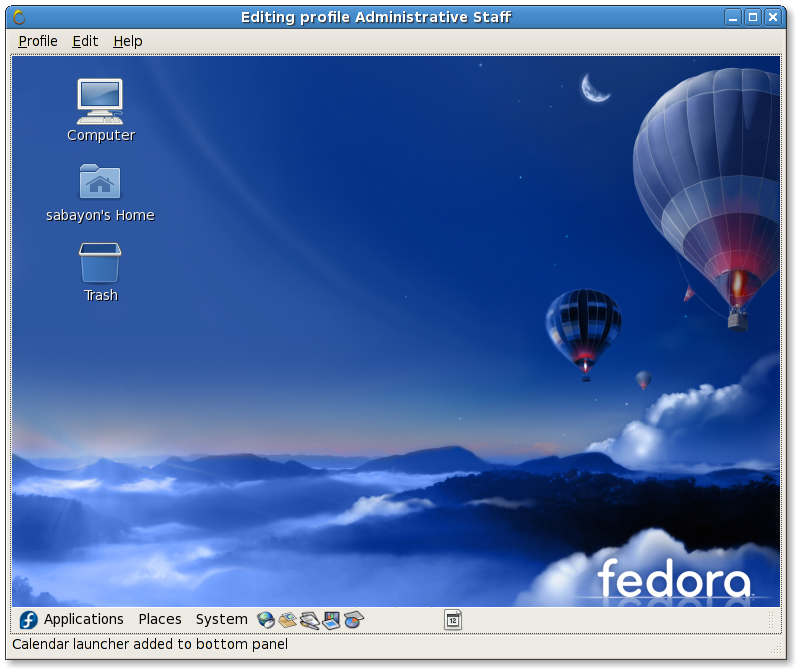
Once the button is pressed while a profile is selected, a GNOME session starts inside the Sabayon editor window (Figure 3). Once the desktop starts up, the administrator may modify and customise the the desktop as per the requirements. The administrator may also choose to modify the lockdown settings for the profile being editing by accessing the integrated version of Pessulus via the -> menu item.
Sabayon keeps track of all the changes being made to a profile, and the list of the changes can be accessed via the -> menu item. The window which pops up (Figure 4) shows a list of all the changes that have been made. It also allows the administrator to ignore a particular change via a checkbox, or to make a particular change mandatory (by clicking on the lock icon).

Once editing is complete, the administrator can save the profile and associate users with it.
Associating users with a particular profile
Multiple users can be associated with a given profile by clicking on the button in the Sabayon main window. The user database is an XML file, usually located in /etc/desktop-profiles/users.xml. The XML file looks like
<?xml version="1.0" encoding="UTF-8"?>
<profiles>
<default profile=""/>
<user name="alahiri" profile="Teachers"/>
</profiles>
To automate the process of applying profiles, the command sabayon-apply should be run by the user during login. To do so, create a file called /etc/X11/Xsesssion.d/60sabayon_apply with the following content:
#
# Apply the Sabayon profile for the current user (if any)
#
if [ "x$DISABLE_SABAYON_XINITRC" = "x" ] ; then
if [ -x /usr/sbin/sabayon-apply ] ; then
/usr/sbin/sabayon-apply
fi
fi
Further resources
PolicyKit is a toolkit aimed at setting and managing policies for carrying out priviledged operations (eg: mounting a removable disk) cleaner and easier.
Evolution Mail Account LDAP Backend For GConf is a GConf backend designed to retrieve a users email account information (email address, incoming/outgoing mail server) from LDAP.
The Python Sabayon page on the GNOME wiki outlines how you can access and apply Sabayon profiles from command line Python scripts.
The Sabayon website has a document on how to use LDAP to retrieve profiles.
Articles, tutorials, etc.
Creating desktop profiles with Sabayon in the Red Hat Magazine.
Dedicated GNOME Desktops with Pessulus and Sabayon: Jail Time in the Linux Magazine.
Lock down the GNOME desktop with Pessulus at Linux.com.